Best Ever Challah

A classic and well-loved bread, Best Ever Challah is a bread lover’s dream. Pillowy and yeasty with just a hint of sweetness. It is one of my favorite things to bake.
It all starts with yeast.
The Goldilocks Ingredient
People shy away from making yeast bread. “Too hard,” they’ll say. Or, “I don’t have the patience for that.” But along came the pandemic and suddenly everyone was trying to make their own sourdough starter.
Yeast is temperamental, I’ll give you that. It’s the Goldilocks of the baking world. The temperature is too hot! Or too cold! Leave me alone for two hours! Or where have you been for the last hour, I’m done!
Everything must be just right. And even then, it may decide that it doesn’t want to perform like it is supposed to that day. Sigh.
However, don’t despair. There are some basic points about making yeast bread that will help you turn out a beautiful loaf.

Types of Yeast
First, let’s talk about the types of yeast you will find in your grocery store. We won’t address fresh yeast here since it isn’t as commonly found. These are all granulated dry yeasts that come in quarter-ounce sachets or one-pound bags.
- Active dry yeast. This type of yeast requires you to dissolve it in warm water to activate it. When you see a recipe call for “proofing” the yeast, this is what that means. Look on the package for the expiration date and heed it. This type of yeast is perishable and many times active dry yeast will not activate because it is dead.
- Instant dry yeast. This yeast is 100% active and is the best performer. Because the granules are tinier, there is no need to dissolve it in warm water before using. You can add it directly to the other dry ingredients without rehydration or proofing. Once you’ve opened a bag, store it in the freezer where it remains stable for a long time (like years).
- Rapid rise (fast-acting) dry yeast. This is a type of instant yeast. It is stable, like instant dry yeast, and always up to the task. The difference here is the way it performs. It is designed to work more quickly and is best for breads that only require one rise time.
When reading yeast bread recipes, take note of what type of yeast it is specifying. The directions will reflect what steps to take for the type of yeast required. For instance, a recipe that lists active dry yeast should have a step to prove the yeast before adding it to the other wet ingredients while one that calls for instant dry yeast will not.

Steps for Making Yeast Bread
So, how do we make those beautiful loaves of golden brown? Here are some tried and true steps to help you on your yeast bread journey.
Choose your flour. Bread flour is best for yeast bread. It has a higher gluten and protein content than all-purpose flour, giving the finished loaf a nice chew. You can substitute it for all-purpose flour but may need to adjust the amount by a half cup or more.
Don’t kill the yeast. Using water that is too hot will kill off the yeast. Water should be under 115F/46C.
Keep the salt separate. Don’t add the salt and yeast at the same time as salt can inhibit or kill off the yeast development.

Knead the dough. Kneading builds the gluten network that allows the dough to rise. So knead the dough by pressing down with the heels of your hands and stretching it forward. Fold it in half, give it a quarter turn, and repeat for the next 10 minutes of your life. Or place the dough in your stand mixer and let the dough hook do the work for you. The goal is dough that is smooth and stretchy.
Proof it. Place the dough in an oiled bowl and cover the bowl with plastic wrap. Allow it to rise for anywhere from one to two hours. Yes, very unscientific, I know. So much depends on the temperature of your kitchen. The optimal temp is around 75F/24C. Look for dough that has doubled in size as the indicator that it is ready.

Shape the dough and proof again. Do your best Jackie Chan move and punch down the dough. Divide and shape the dough, then place it on the baking sheet. Allow the dough to rise and double again. This could be 45 minutes or an hour and a half.
Bake! It helps to have an oven temperature gauge to see if your oven runs hot or not. An oven that routinely runs hotter than the set temp will turn out dry, overbaked bread even when you follow the baking directions.
Lessons Learned
- Prepare to spend a few hours on this recipe. Much of it is waiting, but it is best to make it on a day when you are not rushed.
- If you want to add raisins or nuts to your challah, wait until after you have punched down the dough and are ready to shape it for the second proofing. Adding them too early can slow down the initial rise.
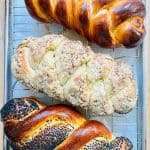
- Traditionally, challah is braided into a 3-strand braid but you can get fancy and do 2, 4, 5, or 6 strands.
Hat Tips
Many thanks to the Kosher Baker for the classic challah recipe.

Best Ever Challah
- Prep Time: 30 minutes
- Proof Time: 2 to 3 hours
- Cook Time: 30 minutes
- Total Time: 1 hour plus proof time
Ingredients
Dough:
- 4 ½ teaspoons (2 packets ¼ oz each) active or instant dry yeast
- ¼ cup warm water
- ¾ cup granulated sugar
- 1 Tbsp honey
- ½ cup olive oil
- 1 Tbsp salt
- 1 ½ cups warm water (105 to 115F/40 to 46C)
- 3 eggs, lightly beaten
- 6 to 7 cups bread flour
Egg wash: 1 egg lightly beaten with 1 teaspoon water
Toppings: sesame seeds, black sesame seeds, or poppy seeds
Sweet crumb topping:
- 1 cup all-purpose flour
- 1 cup granulated sugar
- 5 Tbsp butter, softened
Instructions
- If you are using active dry yeast, pour the yeast and ¼ cup warm water into a small bowl and let dissolve. Set aside for 10 minutes to proof and thicken. If you are using instant dry yeast, you will add it in step 3.
- Tip the sugar, honey, oil, and salt into a large mixing bowl. Pour in the water and stir to dissolve the sugar and salt.
- Add the yeast mixture or the yeast and the 3 beaten eggs to the sugar and oil mixture. Whisk everything together. Start adding the flour, one cup at a time, stirring with a large spoon after each addition. Gauge the stickiness of the dough after each cup of flour is added. You may need barely 6 cups or closer to 7 depending on how your flour absorbs the liquids. Yeasted dough has a mind of its own and is never the same every time you make a recipe.
- Knead the dough on a flat surface for 5 to 10 minutes, until it is no longer sticky and the surface feels smooth and elastic.
- Lightly oil the large mixing bowl and place the dough in it, turning to coat it in oil. Cover and let the dough rise in a warm place for 1 hour.
- Divide the dough into either 2 or 3 equal pieces. These will make either 2 large challahs or 3 medium-sized ones.
- Take one of the pieces and divide it into three pieces. Roll each piece into a rope, then braid them together. Repeat with the other dough. Place the loaves on separate baking sheets lined with parchment paper. Allow to rise for 45-ish minutes.
- Preheat the oven to 350F/176C. Move the oven racks to the upper and lower thirds of the oven. Brush the loaves with the egg wash and add the toppings.
- To make the sweet crumb topping, rub the flour, sugar, and butter together using your fingertips to form coarse crumbs. Pat the crumbs on top of the egg-washed loaf.
- Bake for 30 to 35 minutes or until deep golden brown. The bread should sound hollow when tapped and read 190F/88C when tested with a thermometer. Place on a wire rack to cool for 20 minutes before slicing.
- Baked loaves can be wrapped in plastic, placed in a Ziploc bag, and frozen for 3 months. Thaw at room temp before serving.


Leave a Reply